# Custom Material Node

### Creation of Material <a href="#howtocreateacustommaterialnode-creationofmaterial" id="howtocreateacustommaterialnode-creationofmaterial"></a>

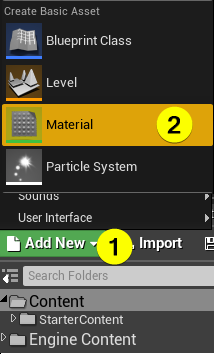
First of all, create a material. Use ADD NEW button which is at top left corner of content browser window or access it via right click in empty area of content browser and choose it from component menu.

<div align="left"><img src="https://3682414700-files.gitbook.io/~/files/v0/b/gitbook-x-prod.appspot.com/o/spaces%2FEesbrFT840vDc0axDrZ6%2Fuploads%2F9QoX30Kd4P4nc0RDxhkg%2Fimage.png?alt=media&#x26;token=a03c94e6-0abf-4b3f-85cf-69a0d5ad7430" alt=""></div>

### Changing the Material Domain
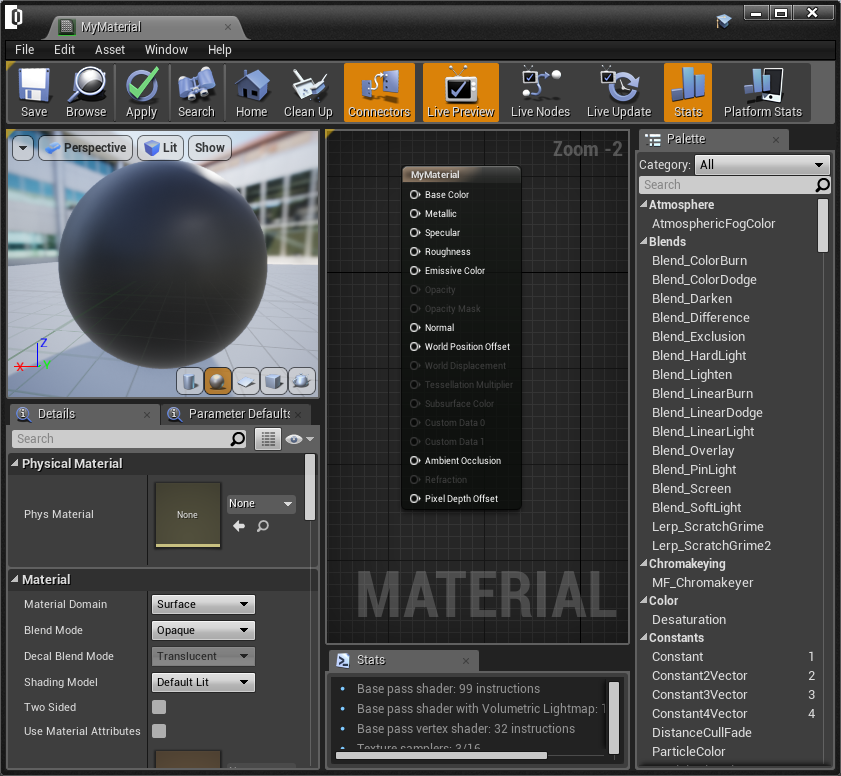
 <a href="#howtocreateacustommaterialnode-changingthematerialdomain" id="howtocreateacustommaterialnode-changingthematerialdomain"></a>

* Open the material.

<div align="left"><img src="https://3682414700-files.gitbook.io/~/files/v0/b/gitbook-x-prod.appspot.com/o/spaces%2FEesbrFT840vDc0axDrZ6%2Fuploads%2FG5xgRQXgn6zKgx04TrfQ%2Fimage.png?alt=media&#x26;token=8802a948-3c36-42f2-ad30-70aa63f7dad5" alt=""></div>

* Change the material domain as REALITY NODE from material section which is inside of details panel. (The details panel located left bottom of material editor.)

<div align="left"><img src="https://3682414700-files.gitbook.io/~/files/v0/b/gitbook-x-prod.appspot.com/o/spaces%2FEesbrFT840vDc0axDrZ6%2Fuploads%2FLQjwLkFA2MECg1YK6svr%2Fimage.png?alt=media&#x26;token=7cd5045e-d31d-4d87-94a5-752159b22e44" alt=""></div>

* Apply and save changes.

### Coding the Material <a href="#howtocreateacustommaterialnode-codingthematerial" id="howtocreateacustommaterialnode-codingthematerial"></a>

In this tutorial we will show changing color of material as example. There are two ways to add material node to the graph:

First Method:

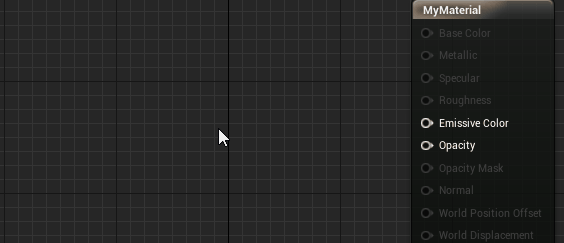
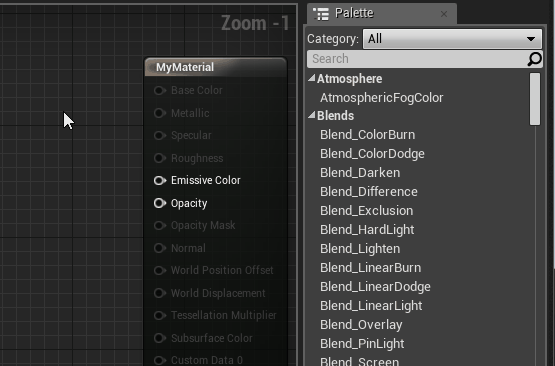
* Click the empty area of material graph. Select node.

<div align="left"><img src="https://3682414700-files.gitbook.io/~/files/v0/b/gitbook-x-prod.appspot.com/o/spaces%2FEesbrFT840vDc0axDrZ6%2Fuploads%2FPFJMMaZ6B62nBxAA5pM0%2Fimage.png?alt=media&#x26;token=c1ae482f-ecd2-4129-b6f5-e8ede76dc445" alt=""></div>

* Select the node from palette which is at right of material editor, drag and drop to the graph.

<div align="left"><img src="https://3682414700-files.gitbook.io/~/files/v0/b/gitbook-x-prod.appspot.com/o/spaces%2FEesbrFT840vDc0axDrZ6%2Fuploads%2Fm2nTNahsrpf0rDOGqBGx%2Fimage.png?alt=media&#x26;token=ef75775d-08d8-430e-bb5f-e30d9271b8d5" alt=""></div>

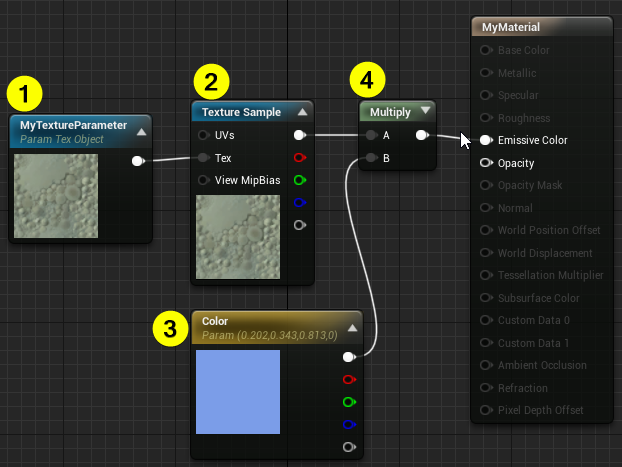
Let's code the material.

* Add a TEXTUREOBJECTPARAMETER node.
* Add a TEXTURESAMPLE node.&#x20;
* Add a VECTORPARAMETER  node.
* Add a MULTIPLY node.
* Link them as shown in below image.

<div align="left"><img src="https://3682414700-files.gitbook.io/~/files/v0/b/gitbook-x-prod.appspot.com/o/spaces%2FEesbrFT840vDc0axDrZ6%2Fuploads%2FE3B7xF5Jozzbm19WlDO9%2Fimage.png?alt=media&#x26;token=141dad29-fa87-4ca4-afaa-02dca17e63e0" alt=""></div>

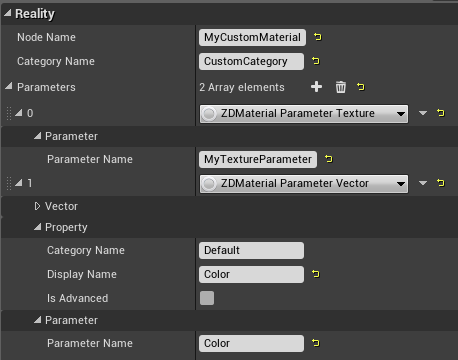
### Material Definition for Reality <a href="#howtocreateacustommaterialnode-materialdefinitionforreality" id="howtocreateacustommaterialnode-materialdefinitionforreality"></a>

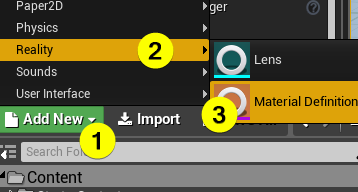
* Click the ADD NEW button.
* Hover mouse cursor on Reality then select "MaterialDefinition".
* Open MaterialDefiniton class.&#x20;

<div align="left"><img src="https://3682414700-files.gitbook.io/~/files/v0/b/gitbook-x-prod.appspot.com/o/spaces%2FEesbrFT840vDc0axDrZ6%2Fuploads%2FYUufeXpPmmox7pq6fC0q%2Fimage.png?alt=media&#x26;token=ad701f2d-a157-47be-853c-bd9971d34619" alt=""></div>

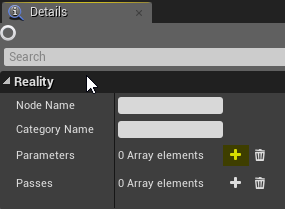
* Add two parameters.  Example has two parameters. TEXTUREOBJECTPARAMETER and VECTORPARAMETER

<div align="left"><img src="https://3682414700-files.gitbook.io/~/files/v0/b/gitbook-x-prod.appspot.com/o/spaces%2FEesbrFT840vDc0axDrZ6%2Fuploads%2FHC3L4ha6QXg2qjcbuK1J%2Fimage.png?alt=media&#x26;token=bdae2f61-e9b2-4d1e-82d7-1f9020d4e26e" alt=""></div>

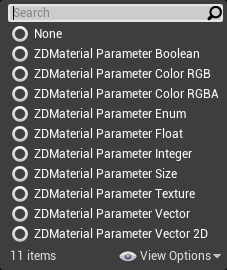
* Click the plus icon then select type of parameters.

<div align="left"><img src="https://3682414700-files.gitbook.io/~/files/v0/b/gitbook-x-prod.appspot.com/o/spaces%2FEesbrFT840vDc0axDrZ6%2Fuploads%2F5YDREjy3pO3ZUMhbEojw%2Fimage.png?alt=media&#x26;token=c4bc93fc-2cbf-4d30-9609-6748837227dd" alt=""></div>

* Set properties of parameters.

{% hint style="info" %}
The has to same with parameter name of material nodes.
{% endhint %}

<div align="left"><img src="https://3682414700-files.gitbook.io/~/files/v0/b/gitbook-x-prod.appspot.com/o/spaces%2FEesbrFT840vDc0axDrZ6%2Fuploads%2FSP2gitQAv8h2tP9B8h1C%2Fimage.png?alt=media&#x26;token=d991fd42-4e6b-4721-a103-ebaa894e3afa" alt=""></div>

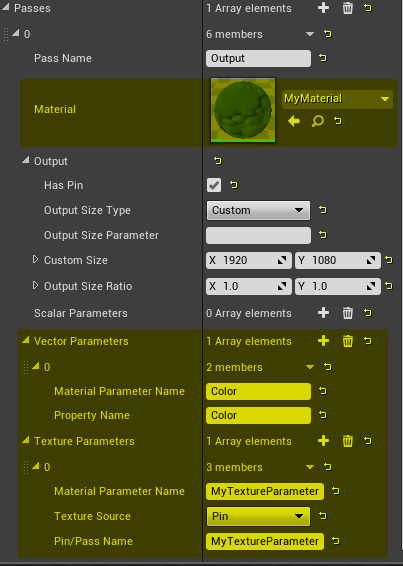
* Open the passes section which under parameters section.&#x20;

{% hint style="info" %}
In this section inputs passes to output. If you don't define pass parameters the inputs changes would not apply on output.
{% endhint %}

* There were 2 inputs. TEXTUREOBJECTPARAMETER and VECTORPARAMETER. Set them in this section to apply as result.
* Set material.
* Add parameters as output. Save changes.

<div align="left"><img src="https://3682414700-files.gitbook.io/~/files/v0/b/gitbook-x-prod.appspot.com/o/spaces%2FEesbrFT840vDc0axDrZ6%2Fuploads%2FlNnjyIPdv9YNAGJGAKGh%2Fimage.png?alt=media&#x26;token=ca160d78-8c06-40ea-a785-2cbe7cb6ae97" alt=""></div>

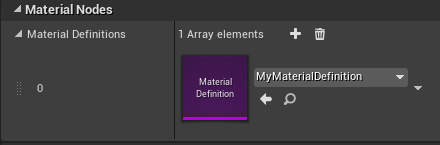
### Exporting to Reality <a href="#howtocreateacustommaterialnode-exportingtoreality" id="howtocreateacustommaterialnode-exportingtoreality"></a>

* Open project settings from EDIT → PROJECT SETTINGS
* Open Exports tab under Reality title.
* Add an element to the array in the Material Definitions tab under the Material Nodes.
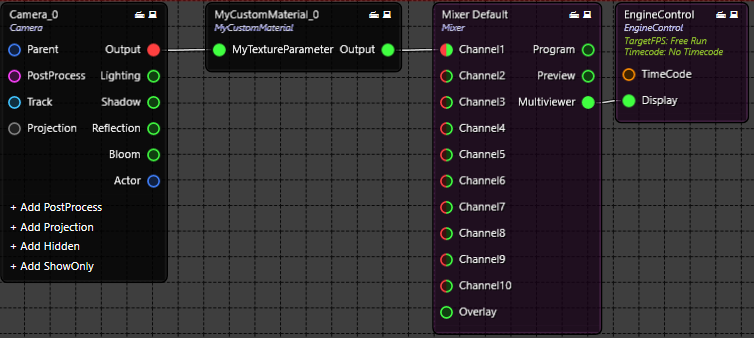
<div align="left"><img src="https://3682414700-files.gitbook.io/~/files/v0/b/gitbook-x-prod.appspot.com/o/spaces%2FEesbrFT840vDc0axDrZ6%2Fuploads%2FuFA7gGWpKsTIYTJumv77%2Fimage.png?alt=media&#x26;token=ec9022cb-7b0a-41a0-9194-ecbad38ba606" alt=""></div>

### Setup in Reality <a href="#howtocreateacustommaterialnode-setupinreality" id="howtocreateacustommaterialnode-setupinreality"></a>

* Click to PLAY button.
* Open Reality Setup.
* Right click an empty area then hover on CustomCategory. (This comes from MaterialDefinition class. We set it under Category Name.)
* Add custom material node.

<div align="left"><img src="https://3682414700-files.gitbook.io/~/files/v0/b/gitbook-x-prod.appspot.com/o/spaces%2FEesbrFT840vDc0axDrZ6%2Fuploads%2FvNHZxkZ9ES9CqkDbJg0h%2Fimage.png?alt=media&#x26;token=6fc08d1a-f946-4d60-8053-7447e9209c1d" alt=""></div>

* Set your graph as shown in below image. We use CAMERA for texture input.

<div align="left"><img src="https://3682414700-files.gitbook.io/~/files/v0/b/gitbook-x-prod.appspot.com/o/spaces%2FEesbrFT840vDc0axDrZ6%2Fuploads%2F6p50dNJ0O2CwRjL2y5Pn%2Fimage.png?alt=media&#x26;token=dbed73d7-6247-4a55-ae6a-2b5d8f7b70a8" alt=""></div>

* Click on properties tab of the MYCUSTOMMATERIAL node.
* Change color value from properties menu.

Let's check the result.

<div align="left"><img src="https://3682414700-files.gitbook.io/~/files/v0/b/gitbook-x-prod.appspot.com/o/spaces%2FEesbrFT840vDc0axDrZ6%2Fuploads%2FNk9tJAKfABUUn9cdgtbT%2Fimage.png?alt=media&#x26;token=b778febe-8441-499e-8b80-facbc7309580" alt=""></div>
