LogoLogo
Zero Density PortalZero Density Academy
Reality 5.3 SP3
Reality 5.3 SP3
  • Reality 5.3 SP3
    • What's New
    • From Reality 5.3 SP2 to SP3
    • User Guide
      • What is Reality Editor?
      • What is Reality Engine?
      • What is Reality Hub?
        • System Overview
      • Reality Workflow
      • Launcher
        • Launcher Interface
        • Engine Status Colors
        • Engine Display Window
        • New Launch Configuration
      • Nodegraph/Actions
        • Nodegraph
          • Node Structure
          • Node Details Panel
            • Property
            • Function
            • Function Property
            • Advanced Property
            • Node Details Info Display
            • Node Property Toolset
            • Property Watch Panel
          • Nodegraph Context Menus
            • Node Context Menu
            • Node Property Context Menu
            • Timeline Property Context Menu
            • Pin Context Menu
          • Nodegraph Menu
            • Graphs
          • Portal Pin
          • Sink Pin
          • Reroute
          • Experimental Node Category
          • Node Comment
          • Asset Browser
          • Advanced Preview Monitor
          • Operating Nodegraph
            • Navigating Inside Nodegraph
            • Creating Node
            • Node Connections
            • Incrementing and Changing Numerical Fields
            • Multiple Node Operations
            • GamePad
            • Node Info Display
            • Simplifying Node Network
            • Dynamic Nodes
              • Dynamic Node Operations
          • Node Library
            • Swizzle Node
            • Read Video Node
        • Actions
          • Action Timeline Interface
          • Keyframe Types
          • Interpolations
          • Operating Actions
            • Navigating Inside Actions Module
            • Animating Property
            • Triggering Multiple Actions via Single Button
            • Utilizing Initial Keyframe
            • Duplicating Keyframes
            • Reversing Animation
          • Animation Workflow Tips
        • Form Builder
          • Form Builder Interface
          • Form Builder Components
          • Customizing Component Appearance
          • Operating Form Builder
          • Data Integration
        • Gang Mode
          • Activating Gang Mode
          • Operating Gang Mode
      • Playout
        • Operating Playout
      • Newsroom
      • Cook Manager
      • User Management
        • Advanced User Management
          • User Management UI
          • Role of the Admin and Administrators
          • Example Configuration
            • Creating Administrator Account
            • Creating User Groups
            • Creating Policies
            • Creating New Users
            • Assigning Users to Groups
            • Defining User Groups Policy
          • License Reservation
        • Basic User Management
      • Hardware Monitor
        • Configuration
        • Filter
          • Metrics
          • Engines
        • Specs
        • Metric Display
        • Plot
      • Controlling Unreal Engine 5.3
        • Introduction
        • Supported Versions
        • Available Features
        • UState
          • UState User Interface
          • APM for Unreal Engine 5.3
        • Configuration
          • Unreal Engine 5.3 Configuration
          • RealityHub Configuration for Unreal Engine 5.3
        • Example Pipeline
          • Preparation
          • Exposing Actor Functions
          • Exposing Actor Parameters
          • Grouping Exposed Items
          • Creating Logic
          • Viewport Navigation
          • Unreal Project inside RealityHub
          • Utilizing Media Framework Tools
          • Operating
    • Installations
      • System Requirements
      • Reality Software Component Versions
      • Downloading Distributions
      • Reality Distribution Content
      • Installations
        • Installing Reality 5.3 SP3
        • Installing Reality Hub
          • Upgrading and Downgrading
          • Database Backup and Restore
          • Database Recovery
          • Recap
      • Licensing Reality
        • Licensing Reality 5.3 SP3
          • Reality License Backup and Restore
        • Licensing Reality Hub
    • Configurations
      • Configuring Peripheral Devices
        • NVidia Configuration
        • AJA Configuration
      • Configuring Reality Hub
        • General Configuration
        • Reality Loader
          • RealityEngine AMPERE Led Display
        • Engine Module Configuration
          • Adding Host
          • Adding Groups
          • Channel Assignments
          • General Engine Configuration
        • Project Configuration
        • Project Scanning
        • Cache Management
        • SSL Configuration
        • Proxy Configuration
    • Integrations
      • Octopus Integration
        • Reality Hub MOS Configuration for Octopus
        • Octopus Configuration
        • Utilizing ZD MOS Plugin
      • iNEWS Integration
        • Reality Hub MOS Configuration for iNEWS
        • iNEWS Configuration
      • CII Module Configuration
    • Tutorials
      • Reality Actor Spawning
      • Using Plugins
      • Tracked Billboard
      • Green Screen Virtual Studio
      • Shadow and Ambient Occlusion in Augmented Reality
      • Curved LED Pipeline with Curve XR Node
        • Features
        • Preparation
        • Curve XR Node Details
        • Example Pipeline
      • Color Grading with 3D LUT Files
    • Reality Hub Developers Guide
      • Reality Hub Open-Source SDK
      • REST API
    • FAQ
      • Frequently Asked Questions
      • Glossary
      • How to Read this Documentation
Powered by GitBook
On this page
  • Preliminary Preparation
  • Modifying Curve XR Node
  • Preparing Inner Frustum Track
  • Preparing Outer Frustum Track
  1. Reality 5.3 SP3
  2. Tutorials
  3. Curved LED Pipeline with Curve XR Node

Example Pipeline

PreviousCurve XR Node DetailsNextColor Grading with 3D LUT Files

Please keep that in mind, the example you are going to proceed with is based on our R&D studio. Various aspects might differ from your setup. If you have any further questions, do not hesitate to contact our Support Department.

Preliminary Preparation

  • Drag & drop the UE5 processing node into Nodegraph canvas.

  • Add AJAIn and AJAOut nodes, select your devices and outputs based on your setup.

  • Create your Track node. (In our example it will be the Xync Node)

Modifying Curve XR Node

  • Add Curve XR node to the canvas.

  • Change the following properties based on your measurements: Pitch Angle, Cell Width, Cell Height, Columns Count, Rows Count, Left Tilt/Roll and Right Tilt/Roll, Height Offset, Left Point and Right Point, Cell Resolution, Canvas Resolution.

  • Duplicate the modified Curve XR node.

  • Connect the RealityCamera0.Scene output of the UE5 node to Inner Frustum View of the Curve XR node.

  • Connect the RealityCamera1.Scene output of the UE5 node to Outer Frustum View of the Curve XR node.

Preparing Inner Frustum Track

  • Create Add Track node.

  • Connect the Track output of Xync node to the X input of the Add Track node.

To address a delay in the Inner Frustum at certain zoom levels, which causes a collision with the outer frustum, we must provide additional FOV input for tracking. Our example requires an additional 10-degree field of view (FOV).

This delay is inherent to the tracking process and rendering of the inner frustum.

  • Expand the Y property and change the FOV property to 10.

  • Connect the Z output of the Add Track node into Inner Frustum Track input pin of the Curve XR node.

Pan, tilt, and roll can now be performed independent of zoom level without causing collisions.

Preparing Outer Frustum Track

  • Create a Break node.

  • Create a Make Track node.

  • Connect every Break Track node’s output to the matching inputs of the Make Track node, except for Rotation and fov pins.

Inner Frustum rendered based on where the camera is looking and what is its resolution. On the other hand, the Outer Frustum render continues even if the camera is looking towards a different direction than the LED Screen, because the main purpose of it is to illuminate the scene and talent.

No matter what zoom level you are in, Outer Frustum must always encompass the LED screen, therefore Outer Frustum’s FOV must be fixed.

In the following steps, you need to get the Rotation and FOV data from your Track while framing the LED screen with your studio camera and keeping the zoom level zero, but the driver still will be the Inner Frustum, the first Track Node we added.

Now:

  • Frame the LED screen with your studio camera and keep the zoom level at zero, as illustrated above.

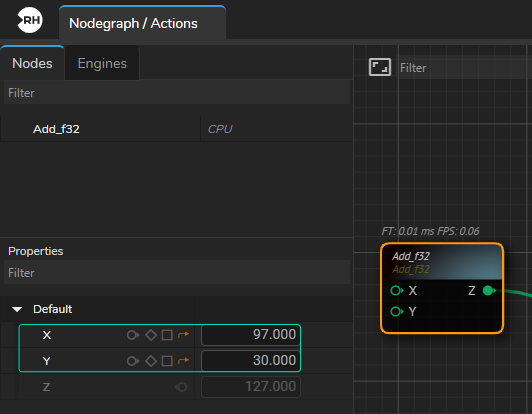
  • Create an Add f32 node.

  • Connect the fov output of the Break node into the X input of the Add f32 node.

  • Connect the Z output of the Add f32 node to the fov input of the Make Track node.

Now we have the FOV value in the full zoom out while our camera is framing the LED screen. On the other hand, the driver still will be the Inner Frustum. Therefore, we need to disconnect the X output of the Add f32 node from the fov.

  • Disconnect the fov output of the Break node from the X input of the Add f32 node.

As the above image suggests, Outer Frustum is rendering with 97 FOV. We need to increase the FOV X and Y by 30 degrees to compensate. With this change, Outer Frustum will project the image onto LED screen with 127 degrees to encompass the LED screen.

  • Create an Add vec3 node and connect its Z output to Rotation input of the Make Track node.

  • Connect the rotation output pin of the Break Track to X input of the Break node.

  • Disconnect the Z output of the Add vec3 node to the fov input of the Make Track node.

  • Connect the Canvas output of the Curve XR node to AJAOut, as illustrated above.

Our scene is successfully projected on the Curved LED.

Prepare your scene, launch it via Reality Hub module.

Create two Reality Cameras. See .

Connect the Track output of Xync node into Break node’s Input pin. Now we have access to Track data. For more details, see .

Launcher
Actor Spawning
Dynamic Nodes
Example Node Network
Camera Connections
Additional FOV for Inner Frustum Track
Preparing Outer Frustum Track
Example of Framing Studio Camera
Overriding FOV
Additional FOV
Curved LED