
Tracked Billboard
In this section, you'll discover how to use the Tracked Billboard pipeline with Reality 5.3 SP2. For our demonstration, we will employ TRAXIS Talent Tracking as a provider.
What Is Tracked Billboard?
Tracked Billboard enables you to seamlessly integrate your keyed talent into the Reality 5.3 SP2 scene, achieving a photorealistic appearance. Furthermore, it can be utilized in a variety of creative scenarios, including Teleportation and Fly Cam.
Process

Login to Reality Hub.
Activate the Launcher module and launch your project.

Go to the Engines section, drag and drop the
UE5process into Nodegraph canvas.
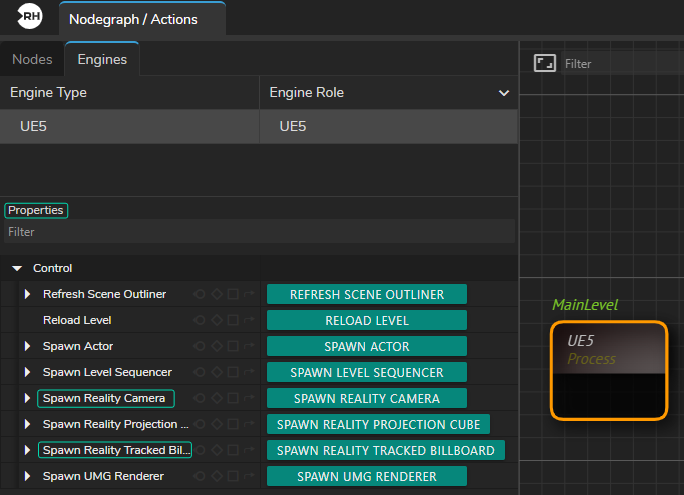
Go to the Node Details Panel.
Click on the Spawn Reality Camera and Spawn Reality Tracked Billboard function buttons.

As soon as you click on abovementioned function buttons, following changes occurs as illustrated above:
Reality Actors folder has been created.
New Properties has been added.

AJAIn and AJAOut NodesCreate
AJAInandAJAOutnodes, then designate your reference by right-clicking on each node. In our example, we have selectedSingleLink 1forAJAInandSingleLink 4forAJAOut.Establish your corresponding camera tracking node. In our example, we utilized
Xync.Connect the
SingleLink 1output pin of theAJAInnode to theSyncinput pin to theXyncnode.
Breaking Track
Breaking Track is a procedure for extracting specific output from a Track node. For instance, you might prefer to use only the Location data from your talent tracking software/hardware or on a focus property of Lens Distortion data for your pipeline. This approach also allows you to conduct advanced compositing operations.
Now:
Create a
Break Tracknode.Connect the
Trackoutput of theXyncnode to theInputinput pin of theBreak Tracknode.
Cyclorama Connections
Now that we have AJA nodes for video I/O, talent tracking, camera tracking, and Reality 5.2 nodes, as illustrated in the previous image, it's time to incorporate Cyclorama.
Add a
Cycloramanode to the canvas.
Distorting and Undistorting
Most camera lenses exhibit some level of optical distortion, and as a result, you often need to perform undistortion and then distortion operations on your video source to address this issue.
For instance, when dealing with the image from your studio and the 3D Cyclorama mesh you've created inside Reality 5.2, they may not align perfectly in terms of lens distortion. To ensure proper alignment between the Cyclorama and camera image, it's essential to employ the undistortion process.
Create two
Distortnodes and oneUndistortnode.

Go to the Properties section of each node you created.
Right-click the
Distortionproperty for each node and select "Show as Input".

Connect the
Lens Distortionoutput of theBreak Tracknode to theDistortioninput pin of theDistortandUndistortnodes.Connect the
SingleLink 1output pin of theAJAInnode to theIninput pin to theUndistortnode.Connect the
AJAInnode'sSingleLink 1output toTrackinput of theCycloramanode.Connect the
Undistortnode'sOutoutput pin toCycloramanode'sVideoinput.Connect the
Cycloramanode'sRenderoutput to firstDistortnode'sIninput pin.Connect the
Cycloramanode'sMaskoutput pin to the secondDistortnode'sIninput pin.
Adding RealityKeyer
Tracked Billboard pipeline requires keyed image of your talent; therefore, you have to use Reality Keyer.

Create a
RealityKeyernode.Connect the
Outoutput pin of the firstDistortnode to theClean Plateinput of theRealityKeyernode.Connect the
Outoutput pin of the secondDistortnode to theClean Plate Maskthe input of theRealityKeyernode. Connect theSingleLink 1output pin to theInputinput pin of theRealityKeyernode.Create a second
Undistortnode, right-click on itsDistortionproperty and select "Show as Input".Connect the
Outputoutput pin of theRealityKeyernode to theIninput of the secondUndistortnode.
Talent Location
In order to place your talent inside the Reality 5.2 scene, you have to provide talent location data via a tracking system. In our example we utilized TRAXIS Talent Tracker.
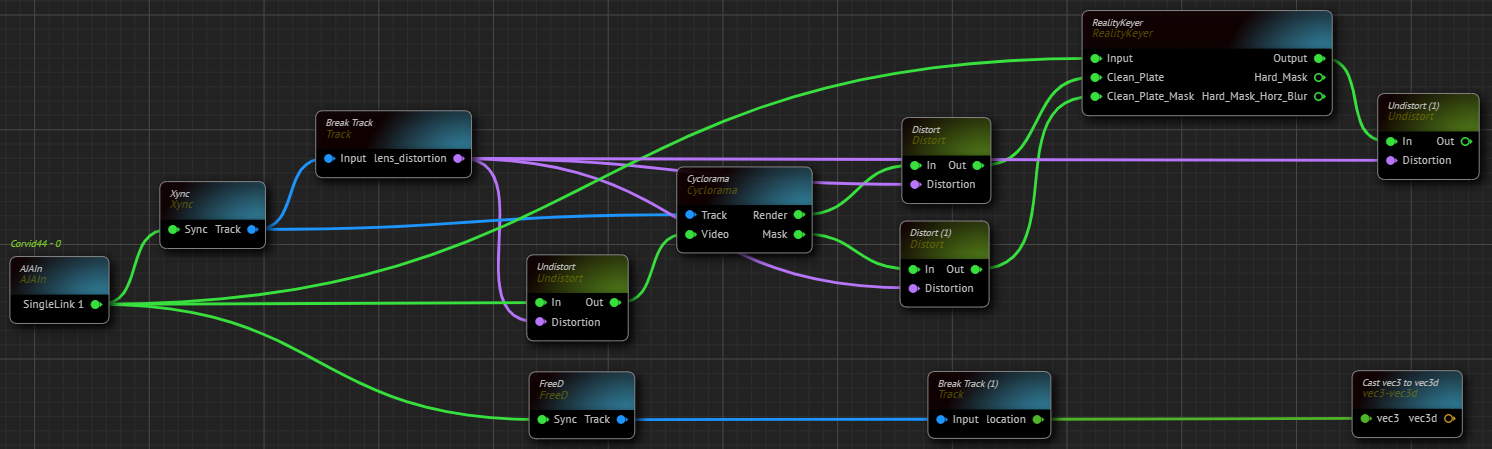
Create a corresponding talent tracking data node. In our example we use
FreeDnode.Add the second
Break Tracknode.Create a
Cast vec3 to vec3dnode.Connect the
Locationoutput pin of the secondBreak Tracknode tovec3input pin of theCast vec3 to vec3dnode.
Engine Connections

Connect the
vec3doutput pin of theCast vec3 to vec3dnode toUE5node'sReality Tracked Billboard Talent Locationinput pin.Connect the second
Undistortnode'sOutoutput pin toReality Track Billboard Videoinput of theUE5node.Connect the
Xyncnode'sTrackoutput pin to theReality Camera Trackinput pin of theUE5node.Create a
Composite Passesnode.Connect
UE5node'sReality Camera Sceneoutput pin toComposite Passesnode'sRenderinput.Connect the
Xyncnode'sTrackoutput to Track input of the Composite Passes node.Connect the
Outputoutput pin of theRealityKeyerto theVideoinput of theComposite Passesnode.Connect the Output pin of the Composite Passes node to SingleLink 4 input pin of the AJAOut node.