LogoLogo
Zero Density PortalZero Density Academy
Reality 5.3 SP1
Reality 5.3 SP1
  • Reality 5.3 SP1
    • What's New
    • User Guide
      • What is Reality Editor?
      • What is Reality Engine?
      • What is Reality Hub?
        • System Overview
      • Reality Workflow
      • Launcher
        • Launcher Interface
        • Engine Status Colors
        • Engine Display Window
        • New Launch Configuration
      • Nodegraph/Actions
        • Nodegraph
          • Node Structure
          • Node Details Panel
            • Property
            • Function
            • Function Property
            • Advanced Property
            • Node Details Info Display
            • Node Property Toolset
          • Node Context Menu
          • Nodegraph Menu
            • Graphs
          • Portal Pin
          • Sink Pin
          • Reroute
          • Node Comment
          • Asset Browser
          • Advanced Preview Monitor
          • Operating Nodegraph
            • Navigating Inside Nodegraph
            • Creating Node
            • Multiple Node Operations
            • Node Connections
            • Incrementing and Changing Decimals
            • GamePad
            • Node Info Display
            • Simplifying Node Network
        • Actions
          • Action Timeline Interface
          • Keyframe Types
          • Interpolations
          • Operating Actions
          • Animating Property
          • Triggering Multiple Actions via Single Button
          • Utilizing Initial Keyframe
          • Animation Workflow Tips
        • Form Builder
          • Form Builder Interface
          • Form Builder Components
          • Customizing Component Appearance
          • Operating Form Builder
          • Data Integration
        • Gang Mode
          • Activating Gang Mode
          • Operating Gang Mode
      • Playout
        • Operating Playout
      • Newsroom
      • Cook Manager
      • User Management
        • Advanced User Management
          • User Management UI
          • Role of the Admin and Administrators
          • Example Configuration
          • License Reservation
        • Basic User Management
      • Controlling Unreal Engine 5.3
        • Introduction
        • Supported Versions
        • Available Features
        • UState
          • UState User Interface
          • APM for Unreal Engine 5.2
        • Configuration
          • Unreal Engine 5.1 Configuration
          • RealityHub Configuration for Unreal Engine 5.1
        • Example Pipeline
          • Preparation
          • Exposing Actor Functions
          • Exposing Actor Parameters
          • Grouping Exposed Items
          • Creating Logic
          • Viewport Navigation
          • Unreal Project inside RealityHub
          • Utilizing Media Framework Tools
          • Operating
    • Installations
      • System Requirements
      • Downloading Distributions
      • Installations
        • Installing Reality 5.3
        • Installing Reality Hub
          • Upgrading and Downgrading
          • Database Backup and Restore
          • Database Recovery
          • Installation Recap
      • Licensing Reality
        • Licensing Reality 5.3
        • Licensing Reality Hub
    • Configurations
      • Configuring Peripheral Devices
        • NVidia Configuration
        • AJA Configuration
      • Configuring Reality Hub
        • General Configuration
        • Reality Loader
          • RealityEngine AMPERE Led Display
        • Engine Module Configuration
          • Adding Host
          • Adding Groups
          • Channel Assignments
          • General Engine Configuration
        • Project Configuration
        • Project Scanning
        • Cache Management
        • SSL Configuration
    • Integrations
      • Octopus Integration
        • Reality Hub MOS Configuration for Octopus
        • Octopus Configuration
        • Utilizing ZD MOS Plugin
      • iNEWS Integration
        • Reality Hub MOS Configuration for iNEWS
        • iNEWS Configuration
      • CII Module Configuration
    • Tutorials
      • Reality Actor Spawning
      • Using Plugins
      • Tracked Billboard
      • Green Screen Virtual Studio
      • Shadow and Ambient Occlusion in Augmented Reality
    • Developers Guide
      • Reality Hub Open-Source SDK
      • REST API
    • FAQ
      • Frequently Asked Questions
      • Glossary
      • How to Read this Documentation
Powered by GitBook
On this page
  • Data Integration Workflow
  • Reality External Data
  • Download Data From URL
  • Execute a JavaScript Function
  1. Reality 5.3 SP1
  2. User Guide
  3. Nodegraph/Actions
  4. Form Builder

Data Integration

PreviousOperating Form BuilderNextGang Mode

Last updated 1 year ago

Reality Hub allows you to integrate external data sources such as weather, finance, elections, and sports right inside your 3d virtual studio, augmented reality configurations, and mixed reality setup.

Reality Hub supports scripting to ingest data from popular database management systems such as MSSQL, MySQL, and PostgreSQL.

We also added XLSX and CSV filetype support which you can store on a local drive, shared folder, or website.

Data Integration Workflow

Every production pipeline has its method and steps to create and publish content, including data integration.

Since there is no monolithic approach to the data integration workflow, the most widespread practice involving Reality Engine/Unreal Engine and Reality Hub may have to apply the following steps:

  1. Designing content inside an Engine

  2. Exposing variables/functions to Reality Hub

  3. Assigning key names based on incoming data

Reality External Data

The ExternalData is a component that allows you to integrate your external data directly into the Form Template design. External data integration has the following steps:

  • Binding Data

  • Ingesting Data

Ingesting data sources can be done by the following methods:

  • Downloading data from URL

  • Executing a JavaScript Function

Download Data From URL
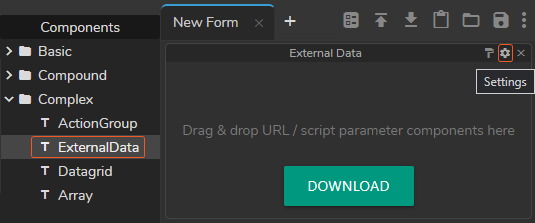
  • Activate the Form Builder module

  • Create a New Form

  • Go to Components > External Data

  • Drag and drop the ExternalData component to your Template Form

  • Click on the Field Settings button as shown in the image above
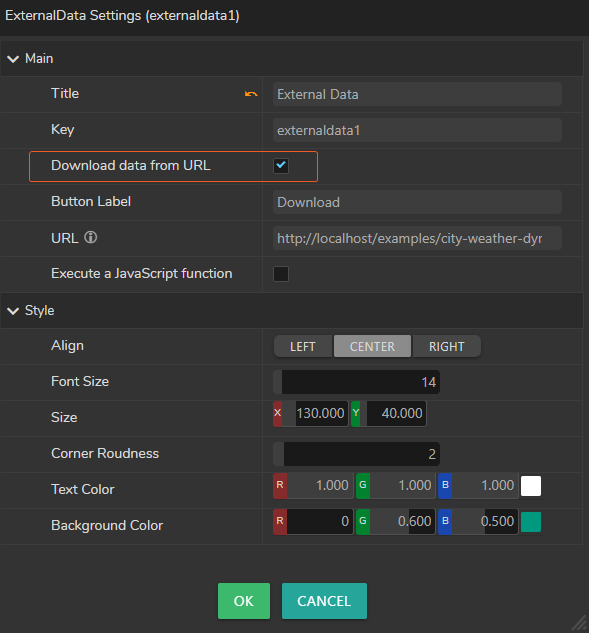
As soon as you click on the Field Settings button, ExternalData Settings window pops up. Now:

  • Click and activate the Download data from URL checkbox as shown on the image above

  • Define the source URL of the data you want to ingest into your Template Form.

Consider that your URL provides weather data for every city in your country, but you need only four major cities’ real-time data to be exposed to your design/blueprint. To do that, you have to add proper keywords inside curly braces of your URL. Later on, in response to every keyword, you have to add a user input component inside the ExternalData so keywords and input values can match uniformly.

  • Put the part in the URL you want to be variable in curly braces.

Example:

http://localhost/examples/city-weather-dyn.json?city={city}&range=2-9

As the example above shows: {city} part in the URL above will be replaced with the information the operator will select or type during the Playout.

  • Use a backslash (e.g., \{) to escape curly braces.

  • External Data Components always parse the URL response as JSON.

The URL on the image above is only for illustrative purposes.

Execute a JavaScript Function
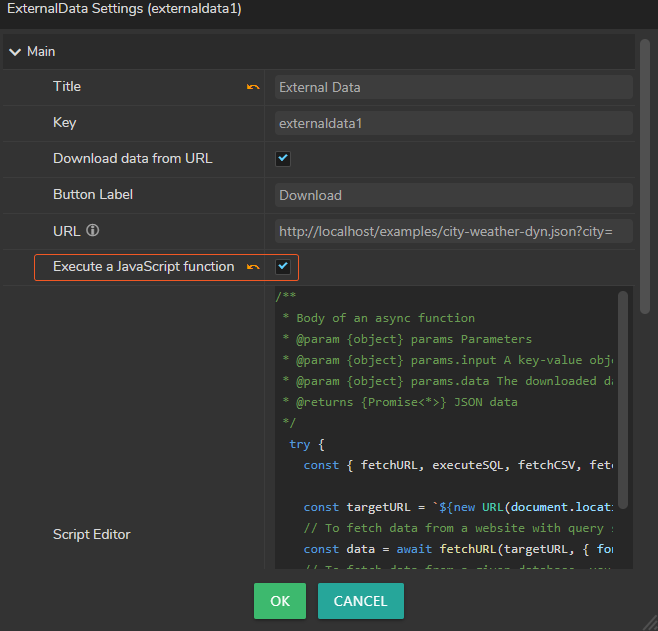
Script Editor inside the ExternalData component allows you to execute a JavaScript function. The sample code inside the Script Editor shows an example of executing JavaScript functions.

Return value defines the JSON data which your Form Template can use; therefore, the return must always be a JSON Object.

/**
 * Body of an async function
 * @param {object} params Parameters
 * @param {object} params.input A key-value object which stores the value of inputs in Remote Data fieldset.
 * @param {object} params.data The downloaded data. If the download checkbox is unchecked then this is set to null.
 * @returns {Promise<*>} JSON data
 */
  try {
    const { fetchURL, executeSQL, fetchCSV, fetchXLSX } = imports;
    
    const targetURL = `${new URL(document.location).origin}/examples/city-weather-dyn.json?city=${params.input.city}&range=${params.input.from}-${params.input.to}`;
    // To fetch data from a website with query string, you can use the following stub.
    const data = await fetchURL(targetURL, { format: "json" });
    // To fetch data from a given database, you can use the following stub.
    /*
    const data = await executeSQL({
      dialect: "pg",
      // dialect: "mysql",
      // dialect: "mssql",
      // dialect: "sqlite",
      host: "127.0.0.1",
      port: "5432",
      database: "db_name",
      user: "db_user",
      password: "db_password",
      query: "SELECT COLUMN_NAME FROM TABLE_NAME"
    });
    */
    // To fetch data from a given csv path and parse it then, which can be a local path or an URL containing csv file
    // , you can use the following stub.
    /*
    const data = await fetchCSV({
      path: "https://people.sc.fsu.edu/~jburkardt/data/csv/addresses.csv",
      option: { separator: ',', headers: false }
    })
    */
    // To fetch data from a given xlsx path, you can use the following stub.
    /*
    const data = await fetchXLSX({
       path: "https://file-examples-com.github.io/uploads/2017/02/file_example_XLS_10.xls"
    });
    */
    return data;
  } catch (ex) {
    console.trace(ex);
    // Throwing errors other than `TransformError` will display a generic error message.
    throw ex;
  }

Launching the project via module or Playing the project in the Editor Mode

Building a Form Template based on the of the node

Adding the HTTPS/JSON/JS component to

Defining the data source in the Settings

Checking results via module

Launcher
Properties and Functions
Form Template
Field
Playout
Data Integration Workflow
HTTPExternalData Component
ExternalData
Reality Hub Script Editor